A pergola is a perfect, multi-purpose addition to any backyard. It offers shade, ambiance, and an area for entertainment. But what if you could turn it into something more, say, a solar pergola?
Believe it or not, you can have a pergola with solar panels attached to it. This will leave you with an eye-catching structure capable of offsetting your monthly electrical bill.
But how much would a DIY solar pergola cost, what can it power, and how exactly do you build your own one?
Let’s take a look.
Affiliate Disclaimer
Table of Contents
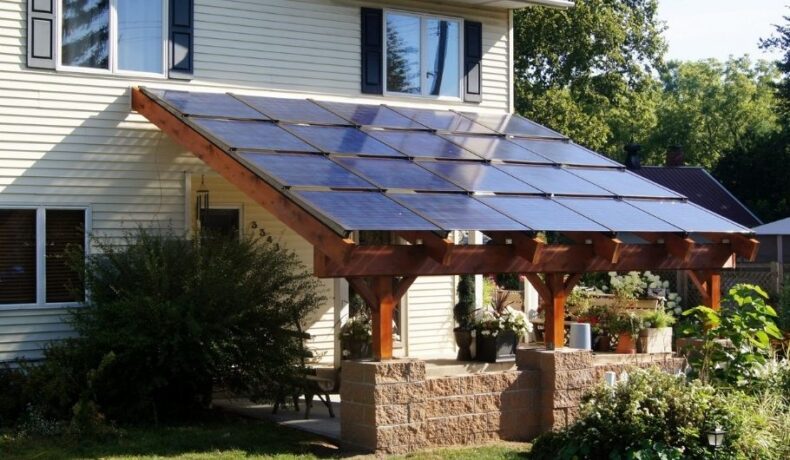
What is a solar pergola?
Source: EnergySage
A pergola is an outdoor structure that provides gardens with shaded areas, sitting areas, or walkways.
A solar pergola adds an integrated solar system to the equation. These are mounted on top of the pergola at an angle to receive the maximum amount of sunlight possible.
Depending on the size of your pergola, it can provide you with enough energy to power the elements of your property or your entire property.
Can solar panels be installed on a pergola?
Yes, you can add solar panels to an existing pergola.
So if you do happen to already have a pergola in your backyard, you can go about
adding solar panels to the structure.
Solar panel weight
If you already have an existing pergola, you might be curious as to the weight that it can hold.
Let’s consider you’re average 100w solar panel:
The dimensions of a 100-watt solar panel typically measure about 40 x 20 x 3 inches. Shorter ones have measurements of around 32.5 x 26.4 x 1.18 inches. In terms of weight, you can expect a 100w solar panel to weigh anything between 14 lbs – 20 lbs.
How much weight can a solar pergola support?
The average pergola can hold up to 300 lbs of weight. Factor in the size of the pergola and the dimensions and weight of your chosen solar panels, and you’ll have a good idea of the number of panels a pergola can hold.
How much does a solar pergola cost?
The cost of a solar pergola will vary greatly. It can depend on the following:
- The size of the structure.
- The number of solar panels.
- The type of solar panels being used.
- The construction materials that need to be purchased.
If you were to consider a basic 10′ x 10′ design, you could expect to pay in the region of $1500. But again, you need to consider the above factors.
How big should your solar pergola be?
Here are some typical sizes for a pergola:
- Small to medium-sized decks: 12ft x 16 ft
- Large decks: 16ft x 24 ft
- Backyard free standing pergola: 12 ft x 16ft or 16ft x 20ft
- Small patio: 12 ft x 12 ft
But here’s the truth — your solar pergola doesn’t need to be a particular size. Again, the size depends on your needs.
The real questions
- How big is your yard?
- What is your budget?
- Are you looking to power several household appliances or go completely off-grid?
These are all important questions that you need to ask yourself and think about before adding a pergola to your property.
What can a solar pergola power?
This will largely depend on the size of your solar pergola and the size and wattage of your solar panels.
Generally speaking, a solar pergola is capable of producing enough power for the following:
- Outdoor lighting.
- Water pumps.
- Swimming pool lights.
- Charging of battery-powered devices.
What are the best solar panels for a solar pergola?
Three main types of solar panels are available on the market:
- Monocrystalline.
- Polycrystalline.
- Thin-Film.
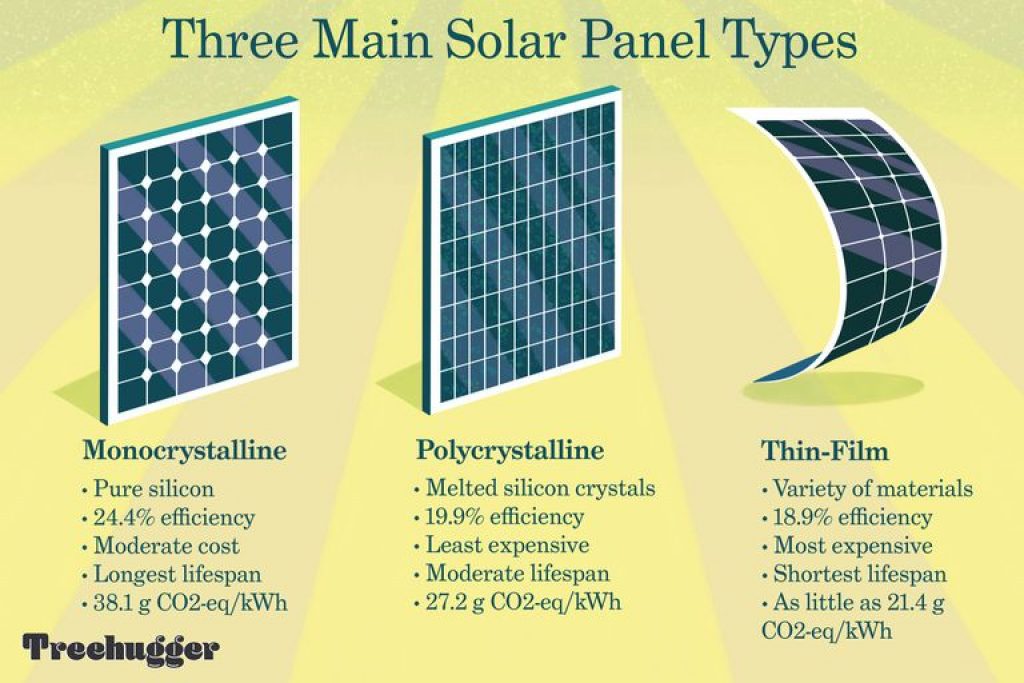
Source: Treehugger
The type that is best for your setup will depend on your budget. But, if you’re thinking about size, then a collection of 100-watt solar panels would be an excellent place to start.
As previously mentioned, the size of these panels makes them nice and lightweight. You can even go a step further by purchasing thin-film versions.
Flexible/thin-film solar panels are far lighter than regular ones, meaning you can hook up far more panels to your pergola.
Here’s an example so you can note the weight difference:
| Solar Panel | Panel Type | Wattage | Weight |
|---|---|---|---|
| 12 Volt Monocrystalline Solar Panel | Flexible | 100W | 4.2 lb (1.9 kg) |
| 12 Volt Monocrystalline Solar Panel | Rigid | 100W | 14.3 lbs/6.5 kg |
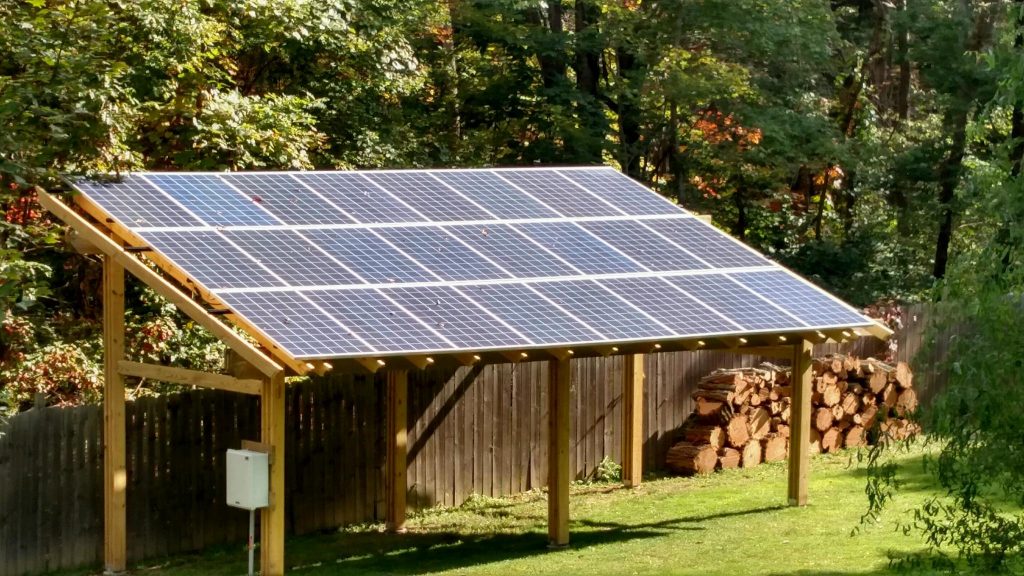
How to build a DIY solar pergola?
In this section, we’re going to provide you with a step-by-step breakdown of a solar pergola build.
Please note: This particular pergola build involves the structure attached to a house’s roof. Additionally, two people can build this structure in 5 days.
All images are courtesy of Ripple Energy.
Tools required for building a solar pergola
Before we get stuck into the phases of construction for a solar pergola, let’s have a look at the materials and tools that you’ll require:
| Tool/Material | Product Links |
|---|---|
| Concrete | Source locally |
| Concrete forming stakes | Source locally |
| Spade + Wheelbarrow /Concrete Mixer |
Fiskars 46 Inch Steel D-handle Square Garden Spade Garden star wheelbarrow Alternatively, you can rent or buy a concrete mixer |
| Sonotubes/ two by fours | Source locally |
| Jackhammer/Dingo | XtremepowerUS Electric Jack hammer TR Industrial Electric Jack Hammer Alternatively, you can rent a jackhammer or dingo |
| Laser Levels | Black & Decker Laser Level BOSCH Cross-Line Laser Level |
| Screws | Timberlock Screws Simpson Strong Tie Structural Wood Screws And Nut Washers |
| Drill | Black & Decker 20V MAX Cordless Drill |
| Wood | Source locally |
| Wood Sander | DEWALT Palm Sander |
| Wood Stainer | #1 Deck Premium Semi-Transparent Wood Stain for Decks, Fences, & Siding |
| Brushes | Pro Grade – Paint Brushes |
| Roof Risers | Purchase from manufacturer |
| Flashing | Provided by riser manufacturer |
| Solar Panels | SunPower panels are a good option |
Phase 1: Constructing the base
Pre-construction
Before you go about constructing your pergola, you need to consider the following:
- Where are you going to place your pergola?
- What will the dimensions be?
- How many panels will you need to create the required electrical output?
There is a fantastic 3D modeling software program called SketchUp that you can use to assist you in designing the pergola.
However you approach the designing process, once it has been completed, you’ll need to have your design approved before getting to work.
Why is this step necessary? Because, like all home construction projects, a permit authorizes the construction project as safe and stable.
There are state, county, and city codes, so this can get confusing. The rule of thumb is to abide by the most local requirements.
In addition to obtaining a permit, you must inspect the property before digging holes for your pergola’s foundation. By doing this, you’ll be able to avoid hitting any electrical wiring, sprinkler lines, or gas pipes beneath your property. If you’re unsure about this step, source a local service provider to assist you.
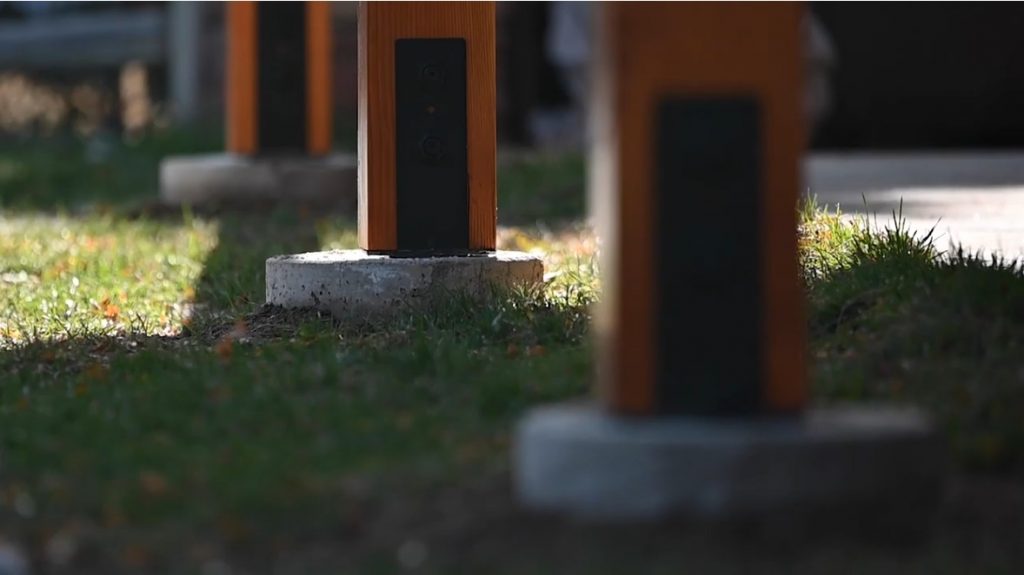
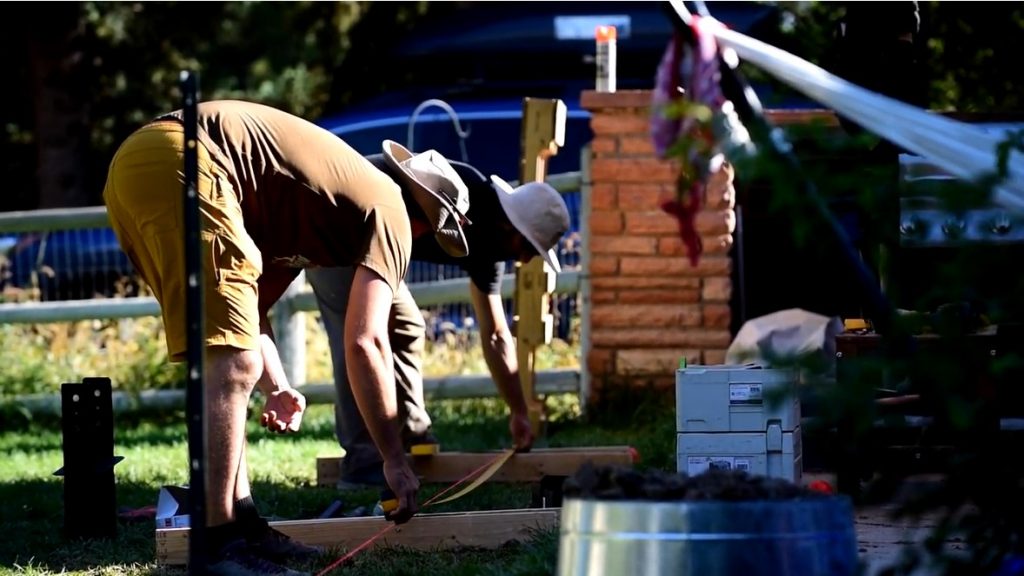
Digging the foundations
- If you have hard ground to go through, you’ll need to source a jack hammer.
- After you’ve dug your holes, straighten and align your columns. You can use string lines or laser levels.
- Before securing the forms to their final position, remember to finish them entirely. You can build your forms with sonotubes and two-by-fours. You can then stake them to the ground using standard steel-concrete forming stakes.
- Mix the concrete. Rent a concrete mixer for this, or purchase a spade and wheelbarrow.
- Finally, once your forms are down, pour the concrete and let it dry for a day.
Additional Info: Ideally, you want to do all the pouring in a single day. You must add small amounts of concrete at a time.
Phase 2: Wood preparation
You want wood that provides visual aesthetics and structural integrity. For this, you’ll need wood sanding and staining equipment.
Process
- Select your desired wood and the number of wooden posts, beams, and rafters your build will require.
- You’ll determine the number of rafters and the spacing between them by the number of solar panels you’re looking to add (along with their weight and dimensions)
- Make sure to measure the height of your columns to make them the correct length.
- Before any structural assembly, you’ll want to sand and stain your wood to eliminate any imperfections.
Staining
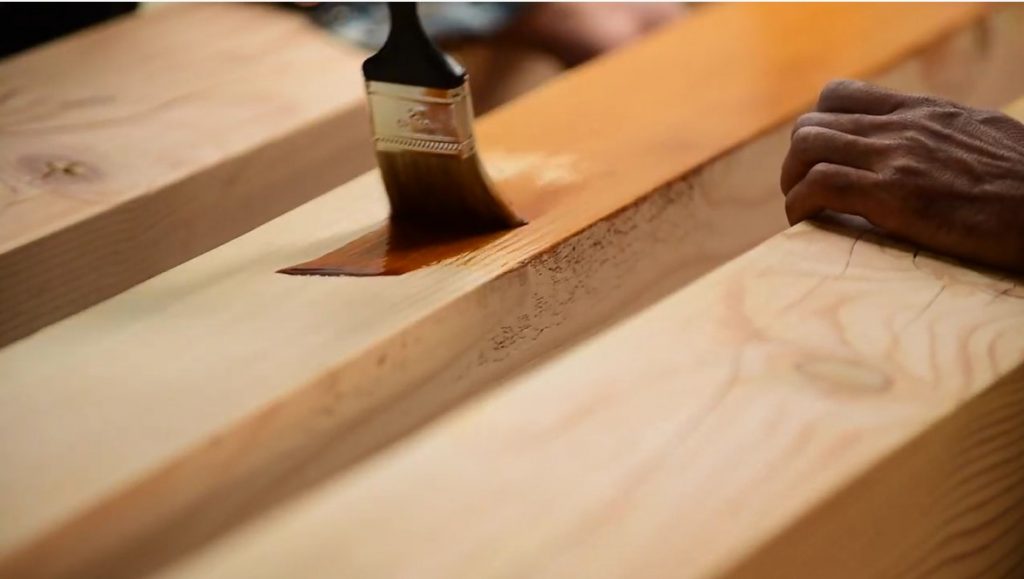
Staining is essential for aesthetic reasons, but it also serves as a protective layer so that your wood can withstand harsh outside elements. 2-3 coats of wood stain are recommended.
Additional Info: Wood staining is a time-consuming process. Each layer can take over 24 hours to dry. This may frustrate you, but you must not skip this step. It is vital for the longevity of your pergola.
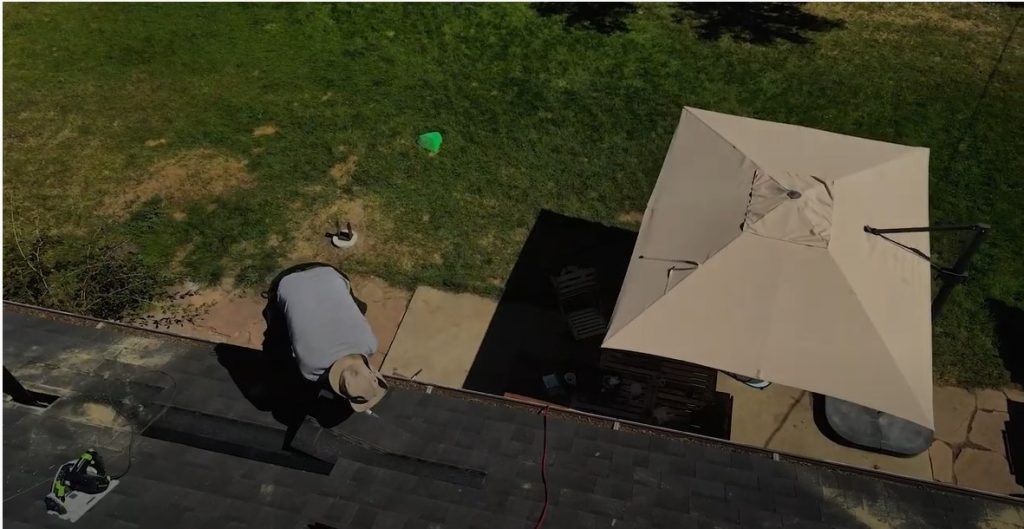
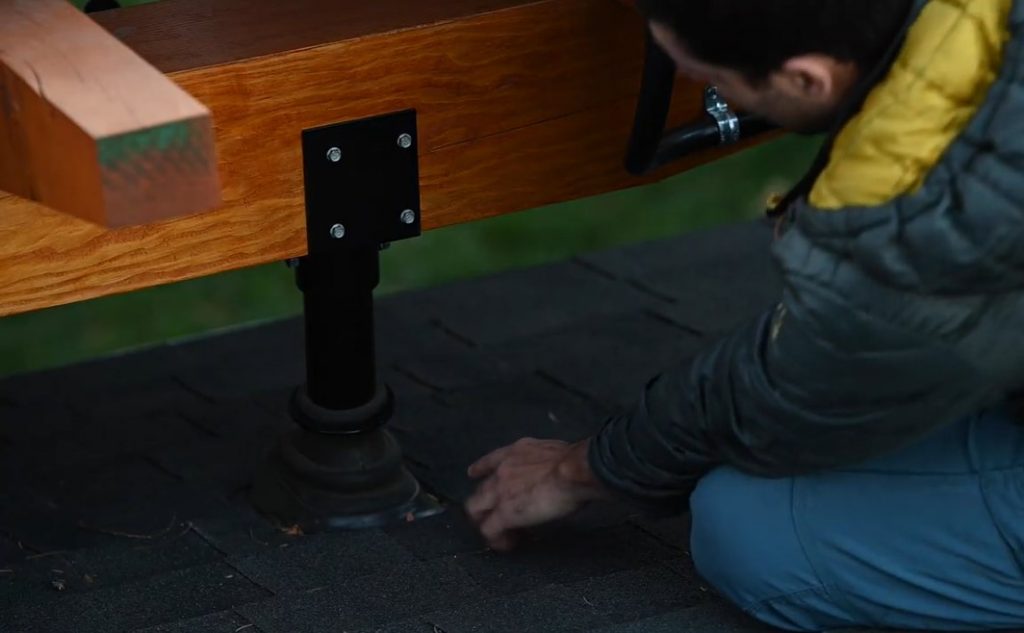
Phase 3: Roofing
Prepping the roof
As previously mentioned, this DIY guide will use a design that requires you to anchor the skylift risers directly to the outside top plate of your house.
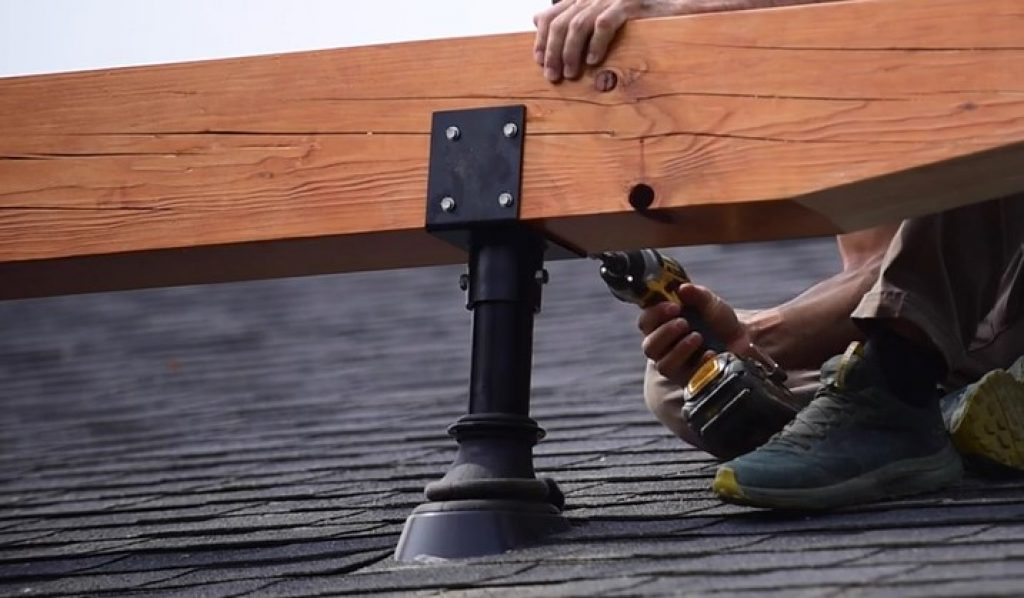
Process
- First, remove the shingles and open holes on your roof. Do this carefully to avoid any leaks.
- To install the roof structure, you’ll need risers, screws, and flashing provided by the riser manufacturer. You’ll also need a way to cut through the roof layers.
- Identify the top plate of your house. Each house will be different, so once you establish this, the next step is to open the holes in the roof.
- You also have different types of roofs. Once you understand and identify where your top plate is located, you need to open a hole big enough, normally square, for the base of the post.
- Open the hole with a circular saw or reciprocating saw. Once you’ve made the hole, you can install the post on top of the top plate, then cover that hole.
- After covering the hole, you need to go ahead and put the flashing. The flashing is what will make everything waterproof.
- Once you’ve finished the riser and the flashing, you can put the U itself, which will hold the entire beam up.
- Lastly, put the beam in. Then you can attach the beam to the U with some screws.
Additional Info: The riser consists of two pieces: The U, along with the post and base, and the flashing.
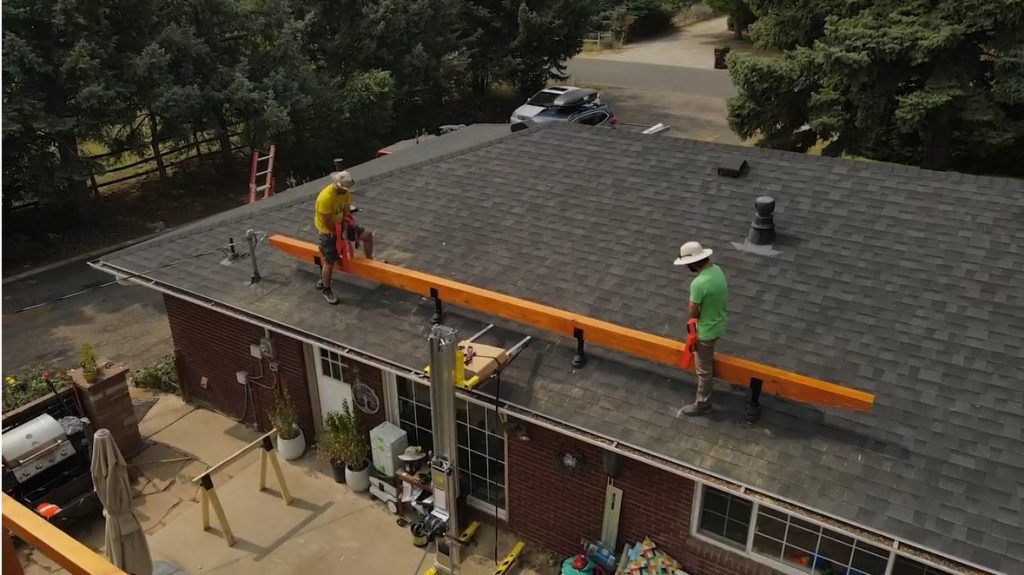
Phase 4: Assembling the structure
Building the structure
Once the concrete footing with braces is ready, and the wood has been sanded and coated, you can assemble your wooden structure.
To do this, start with your ground posts. Make sure you have enough clamps to brace everything before screwing and attaching.
Additional Info: You’ll have to make minor adjustments while fitting everything together, so leaving everything unscrewed is essential.
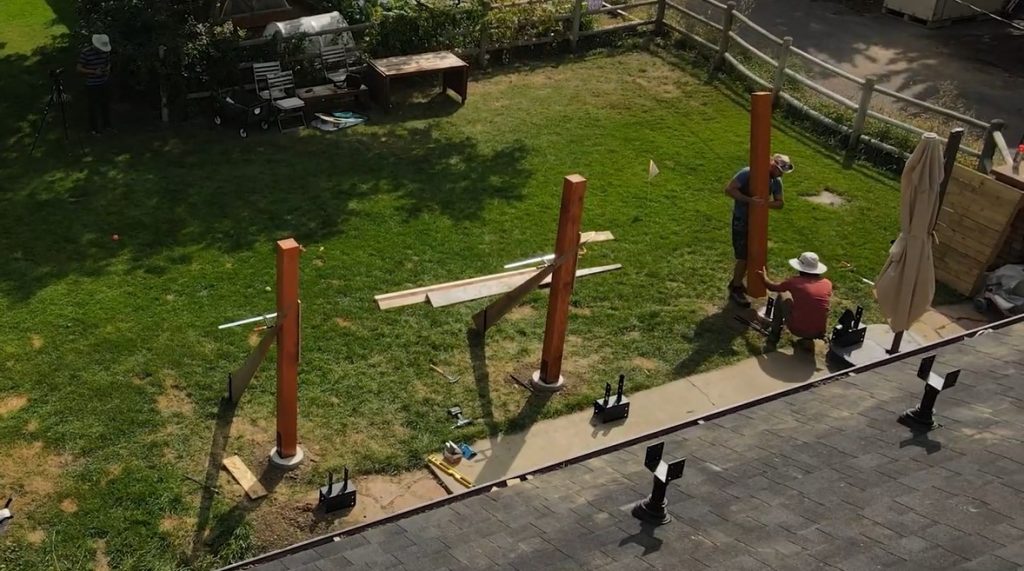
Process
- Place your columns and posts, climb your upper braces, and place the upper beam into position.
- Use Simpson strong tie structural wood screws and nut washers to anchor everything.
- After securing the first beam, replicate the process on the second one, present it, and attach them to the roof risers.
- With both beams secure, it’s time for the rafters.
- You can either do all the woodwork of the rafters onsite or off. If on-site, you’ll need a Japanese handsaw, a circular saw, a sander, and chisels.
- After the cuts are made, you can sand and stain the rafters.
- Then measure the final resting place and screw them up from the top with timberlock 10-inch long screws.
Phase 5: Solar panel installation
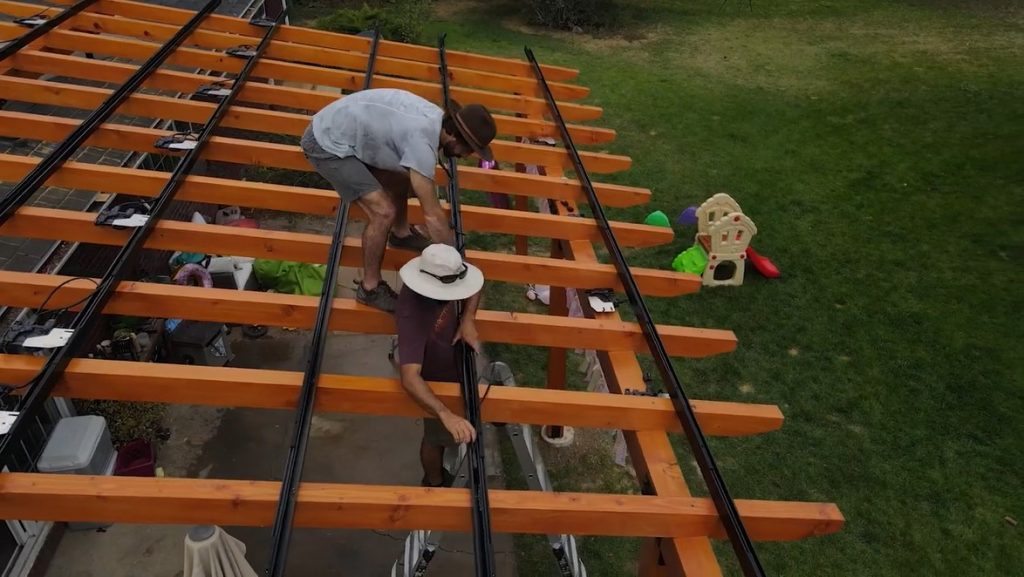
Overview
Panel installation is a multi-faceted process that starts with placing the rails or racking. This area is where the cables will be concealed, the microinverters will be attached, and where the panels will rest.
Process
- Place the rails or racking – the panel manufacturer will provide you with alignment and spacing measurements for the rack assembly.
- Lay down the cabling (trunk cable).
- Ground the pergola with bare copper.
- Attach the microinverters. Each panel requires one.
- Bring each panel up to your structure and connect each one to a microinverter.
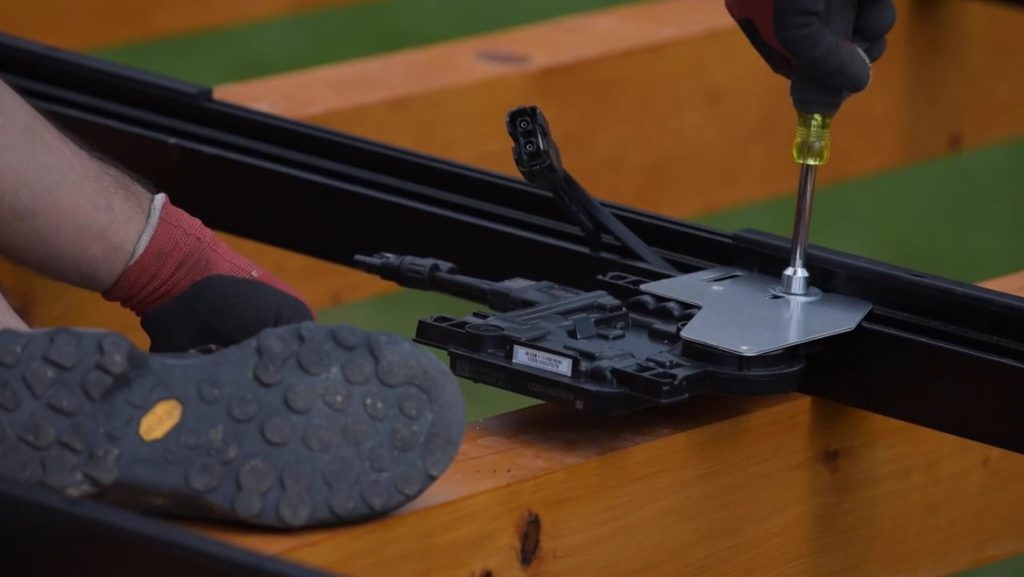
Additional Info: You must recreate the layout of your microinverters by mapping out the position of each of them using the stickers provided so that you can easily monitor each panel and know where each panel is in the system
If you still need to set up a solar system at home that your solar pergola can connect to, we strongly recommend our articles below. These resources will provide you with plenty of helpful information that’ll assist you in setting up your very own residential solar system.
Further reading:
- Setting up A Solar System – The Complete Guide
- Solar Panels For Home Use (The Ultimate Guide)
- Best Pure Sine Wave Inverters (2021) Reviews & Buying Guide
- LiFePO4 100ah (7 Most Reliable Solar Batteries)
- How To Select The Correct Solar Charge Controller
FAQs
Do solar pergolas require any special maintenance due to the combination of wood and solar panels?
While the solar panels themselves require minimal maintenance, mainly occasional cleaning to ensure maximum efficiency, the wooden structure of the pergola might need periodic checks for wear and tear, staining, or sealing to protect against the elements. It’s essential to maintain both components to ensure the longevity of the entire structure.
Is there any risk of the solar panels overheating when installed on a pergola?
Solar panels are designed to absorb sunlight and can get hot during peak sunlight hours. However, the open structure of a pergola allows for adequate airflow, reducing the risk of overheating. It’s always a good idea to ensure there’s sufficient ventilation around the panels.
Can I integrate a battery storage system with my solar pergola?
Yes, you can integrate a battery storage system with your solar pergola. This allows you to store excess energy produced during the day for use during the night or cloudy days, enhancing the efficiency and utility of your solar pergola.
How do I determine the optimal angle for the solar panels on my pergola?
The optimal angle for solar panels depends on your geographical location and the time of year. Generally, for maximum efficiency, you’d want the panels to be perpendicular to the sun’s rays. There are online tools and calculators that can help you determine the best angle based on your specific location.
Can I expand my solar pergola in the future if I want to add more panels?
Expanding your solar pergola depends on its initial design and construction. If you’ve built it with expansion in mind, adding more panels in the future should be feasible. However, you’ll need to ensure that the structure can support the additional weight and that the electrical system can handle the increased capacity.
Are there any tax incentives or rebates available for building a solar pergola?
Many regions offer tax incentives, rebates, or credits for installing solar energy systems, including solar pergolas. It’s advisable to check with local and federal energy departments or agencies to see what benefits might be available in your area.
Final thoughts
Some of you may still be a little undecided about whether investing in a solar pergola is worth it. So here’s a friendly reminder about some of the advantages of having one on your property:
- Aesthetics: Not only are these structures practical, but they’re also aesthetically pleasing. A solar pergola can transform any ordinary garden into an eye-catching space.
- Helping our green friends: Pergolas provide all sorts of plants, ivy, and climbing flowers to thrive in and around their structure. Who doesn’t want to green up their space a little more?
- Shading: There’s nothing better than spending lots of time outside in the comfort of a shady spot.
- Durable & low maintenance: Build it with care, and your solar pergola will be around for years to come, with only intermittent maintenance required.
- Energy: Free, environmentally-friendly energy, anyone?
Looking at the above, it’s easy to see how adding a solar pergola to your property is a no-brainer (if you have the means to do so). These structures are the epitome of beauty meets practicality, and in this day and age, very few things are better suited to that purpose.


Are the joints between the panels sealed so water/moisture does not leak through ?
Hi Roy,
Thanks for reaching out to us!
The joints between solar panels aren’t sealed. Technically, you could use sealant but that could void your warranty.
Instead, you could use a damp-proof membrane. These are however visible from underneath – some may consider this to be an eye-sore.
Purchasing some gypsum board to create a “false-ceiling” of sorts will offset this issue.
In short, you’ll have a more water-tight structure that is still aesthetically appealing.
I hope this helps.
All the best!