The solar charge controller is an essential part of your solar system. Because of this, it is important for you to know how to select the correct solar charge controller to maximize solar energy production and properly charge your battery.
This article is going to assist you with this process by doing a number of things: it’ll describe how solar charge controllers work; give you the key parameters on how to select the best charge controllers according to your needs; and lastly, it’ll explain and compare the two main technologies.
Table of Contents
What Does A Solar Charge Controller Do?
Solar charge controllers have 2 functions:
- Regulate the power output of your solar panel.
- Properly charge the battery.
There are currently 2 types of solar charge controllers: PWM (Pulse Width Modulation) and MPPT (Maximum Power Point Tracking).
The coming sections will describe how they work and what the main differences between the 2 technologies are.
How To Select The Correct Solar Charge Controller – 6 Key Parameters
As previously seen, the solar charge controller is the bridge between your solar panels and your batteries. Therefore, for an optimized set-up it has to match both solar panel array maximum outputs and batteries maximum inputs.
In this section, you will be given the criteri to select the best solar charge controller by looking at its most important specifications: input voltage and current, and output voltage and current.
1. PWM Or MPPT Solar Charge Controller?
The first step is to choose the type of solar charge controller. PWM and MPPT are the two technologies available on the market.
As previously mentioned, PWM is less efficient than MPPT (around 16% for small systems and more for larger PV arrays). Therefore, we can only recommend purchasing an MPPT solar charge controller. There is no point in buying a 100W solar panel and only being able to use, at max 80W because the solar charger is limiting the power output. This would be a waste of money. So go for an MPPT controller. It has a 50% higher upfront cost, but you will definitely save over time.
Now it’s time to look at and focus on the most important specifications of the solar charge controller.
2. Solar Charge Controller Max. PV Open Voltage
This value is the maximum voltage that your solar charge controller can accept – you will connect your solar panel array to the controller. In a solar panel array, all your modules are electrically connected, either in parallel series or the most common is a hybrid parallel/series.
When connected in parallel, the voltage is the same and the current adds up. When connected in series, the voltage adds up and the current is the same.
3. Solar Charge Controller Max. PV Short Circuit Current
This value is the maximum current that your solar charge controller can accept from the solar panel array.
For example, if you have 4 400W solar panels (40V, 9.8Amps), 2 series connected in parallel, therefore your maximum PV voltage is 80V, and your maximum current is 19.6 Amps.
For this system, you will need a solar charge controller that can accept at least 80V and 20Amps, eg., the Victron SmartSolar.
4. Solar Charge Controller Battery Voltage
Not only will the solar charge controller optimize the power output of your system, but it will also charge your battery. You, therefore, have to make sure that it can accept your battery type and voltage (12V, 24V, or 48V).
Most of the MPPT controllers automatically detect the voltage of the battery and can charge both lead-acid and LiFePo4 batteries.
5. Solar Charge Controller Rated Battery Charge Current
After making sure that your solar charge controller is compatible with your battery voltage, check the maximum battery charge current of the solar charge controller. The higher this value, the faster the charge of your battery.
LiFePO4 batteries can achieve quick charge. Usually, they accept 50 to 100Amps from the solar charge controller for a total charging time of 2 to 3 hours. If your solar charge controller can only deliver 10Amps, you won’t be able to enjoy the quick charge benefits.
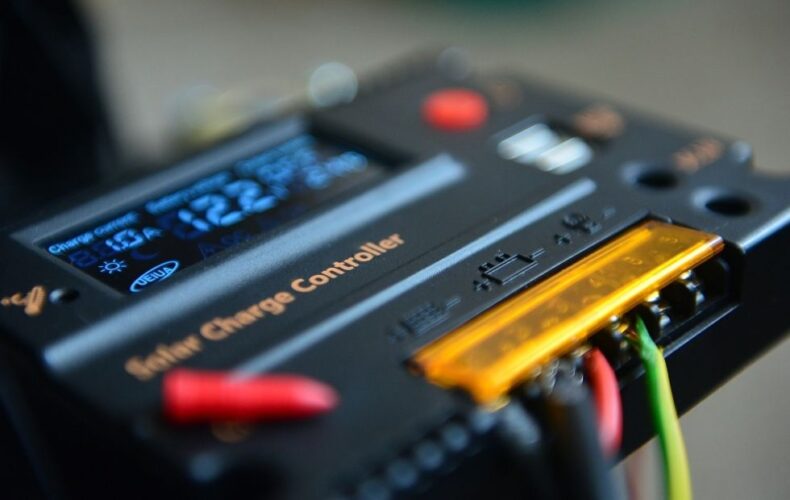
6. Solar Production And Battery Monitoring
Finally, monitoring your production and storage capacity is of great importance in order to regulate your energy consumption, and for maintenance purposes. After a few years, you will have a great database that can help you to adjust the size of your system based on your needs.
Solar Charge Controllers: Why Do You Need Them?
You might wonder why you would need a solar charge controller, knowing that solar panels produce DC power and your battery also works in DC mode.
To better understand how solar charge controllers work, let’s first have a closer look at the outputs of a solar panel and then how to properly charge a battery.
Solar Panel Outputs
A solar panel is an assembly of solar cells. In a solar module (the one on your roof), multiple solar cells are connected in series, usually 36, 72, or 96 for the latest solar panels.
Each solar cell has an output voltage of 0.5V to 0.6V that would mostly remain the same whatever the sunlight. As such, a solar module can have the following output voltages: 36 cells for 18V; 72 cells for 36V; and 96 cells for 48V.

On the other hand, the current output of each solar cell will vary depending on the sunlight intensity.
The power output (W) of a solar panel is obtained by multiplying the voltage of the panel (U) by the output current (I). Therefore, to maximize the power output, you have to maximize U and I.
P(W) = U(V)*I (Amps)
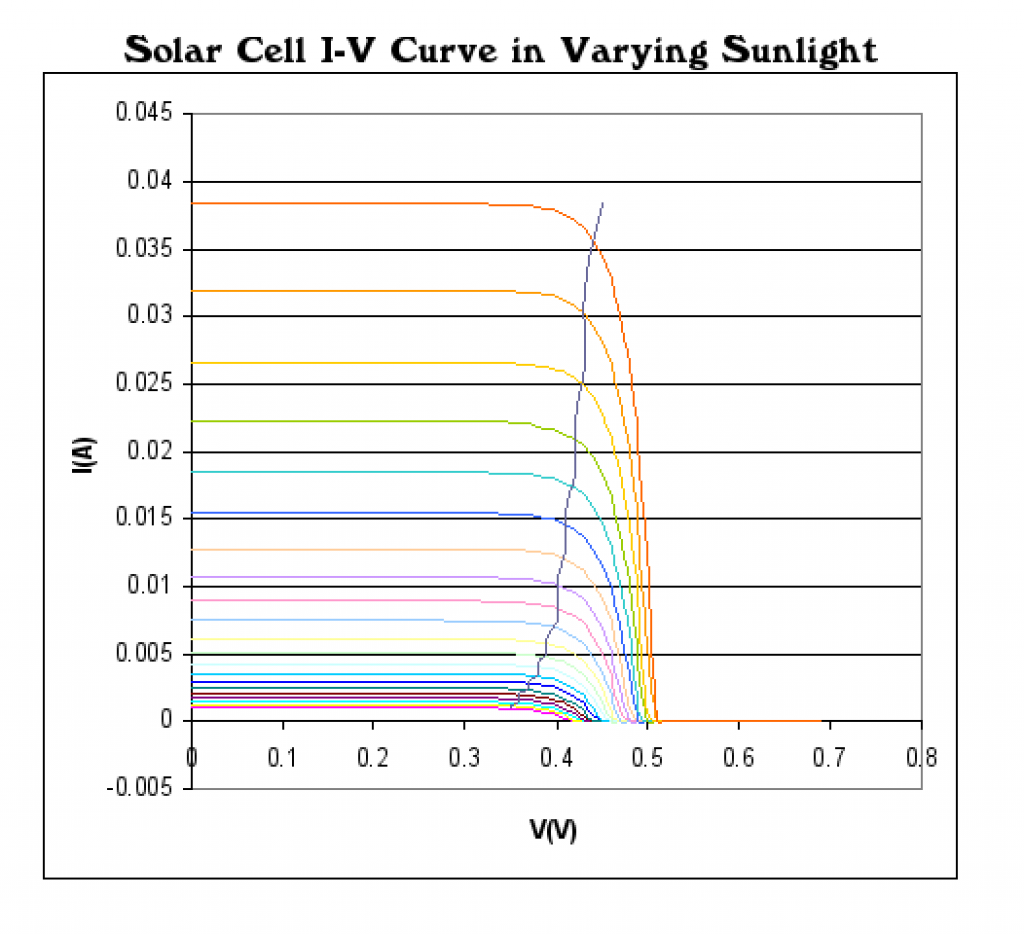
Below, you can see a solar I-V curve in accordance with sunlight. Solar panels are said to be non-linear power generators. Indeed, If the voltage is too high, the output current will drop, such as the output power.
Battery Charging
There are 2 types of batteries currently used for solar systems: the deep-cycle lead-acid (AGM and GEL) and the LifePo4 lithium batteries.
Most recent solar chargers can accommodate both of them. For deep-cycle batteries, you’ll find mostly 12V batteries, and for LiFePO4: 12V, 24V, and 48V.
Without going into too much detail, they both follow a three-step charging profile: bulk mode, absorption mode, and float mode. With each cycle having a specific voltage, for a 12V battery: between 13V and 14V.
In the end, you can see that on one hand, we have solar panels with output voltages of 18V, 36V, or 48V. On the other hand, we have batteries that require no more than 14V. Therefore, the job of the solar charge controller is to match the output voltage of the solar panel with the appropriate battery charging voltage.
Let’s now have a closer look at how both technologies can achieve this goal.
How An PWM Solar Charge Controller Works
The PWM solar charge controller working principle is fairly simple – it acts as an electronic switch.
The controller will first look at the battery charging voltage. If the battery requires 13V to charge in bulk mode then the solar charge controller will impose 13V to the solar panel output – when the controller is switched on.
As the battery is charged, it will reach the absorption mode (higher voltage) and the PWM controller will flicker between ON and OFF.
Finally, when the battery reaches float mode, the controller will switch OFF.
How An MPPT Solar Charge Controller Works
An MPPT solar charge controller can be seen as a smart DC-DC converter. First, it will maximize the power output of the solar panel (this is the smart part) and then convert it to the requested voltage for proper battery charging (DC-DC converter).
Let’s see how it works in more detail:
Perturb And Observe (P&O): The Heart Of MPPT Solar Charge Controller
Most of the MPPT solar charge controllers use the Perturb and Observe algorithm.
We saw that the power output of a solar panel is the product of voltage and current.
P(W)=U(V)*I(Amps)
The solar panel output current is a function of the sunlight irradiation, and we can vary the voltage of the panel by modifying the resistance (R), thanks to Ohms’ law:
U(V)=R(Ohms)*I(Amps).
This is the job of the MPPT solar charge controller: it will vary the voltage at high frequency and analyze the power output with one goal – maximizing it.
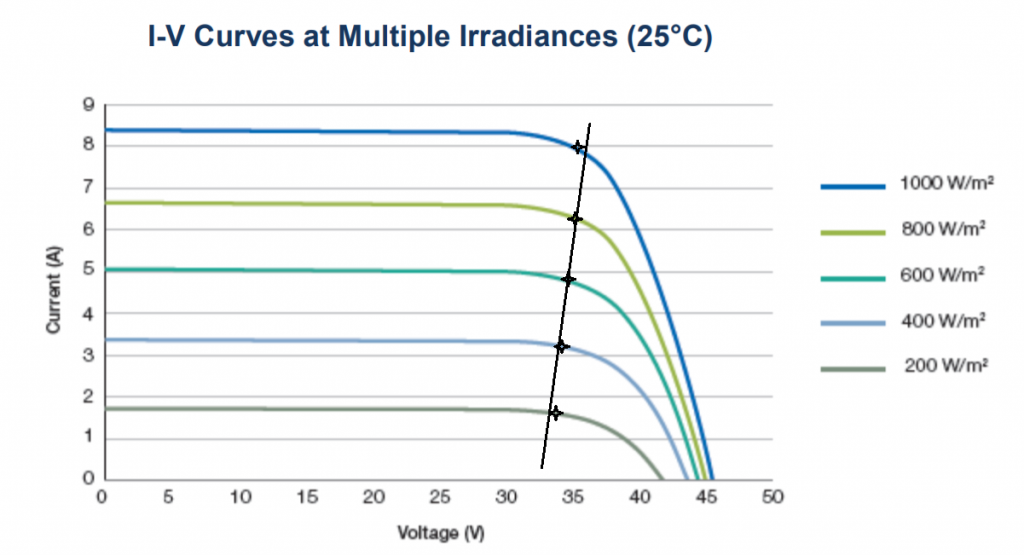
First, the solar charge controller sets a voltage (U1) and measures the power output (P1). Then shortly after, it set another voltage U2=U1+ΔU and measures the power (P2). If P2 is higher than P1, the algorithm will try to impose a higher voltage U3 = U2+ΔU. Conversely, if P2 is lower than P1 it will impose a lower voltage.
In the end, the solar charge controller will permanently adapt the output voltage to get the closest to the maximum power point as shown in the figure below for various sunlight irradiation.
DC-DC Converter
After getting the maximum output from the solar panel, it will convert down the voltage to match the battery charging requirements with minimal loss.
MPPT vs PWM: Which Is The Best?
To answer this question, let’s take an example. We will consider a 100W solar panel with 18.78V output (max. 5.32 Amps output) and a 12V battery that requests 14V to charge.
PWM Solar Charge Controller:
The PWM solar charger will just reduce the solar panel output to 14V, therefore it will get 14V*5.32= 74.5W of maximum power to charge the battery.
MPPT Solar Charge Controller:
The MPPT solar charger will almost reach the maximum output of the solar panel, around 18V*5amps= 90W (PV power loss at high temperature). And then convert down (DC-DC) to match the voltage of the battery: 14V*6.4amps=90W.
In the end, you’ll get 16% more power from the MPPT solar charger compared to PWM.
Given this information, PWM solar charge controllers are recommended for lower budget systems, as PWM chargers are around 2 times cheaper than MPPT.
Final Thoughts
In this article, you were able to see how important the solar charge controller is for your solar setup.
A few things to keep in mind for the future:
Select the correct solar charge controller to optimize solar production and battery charging.
Have a close look at your solar panel array maximum outputs and your battery inputs (voltage and current).
Avoid PWM solar charge controllers, they are inefficient and will waste a lot of your solar production.
Finally, don’t forget to think long-term, you might want to add extra panels or batteries, therefore we would advise you to oversize your solar charge controller, so you won’t need to buy a new one.