Are you thinking of installing a DIY solar system?
While the thought of installing solar panels yourself may seem somewhat daunting and complex (at least initially), we are here to assure you that it’s entirely possible.
With the necessary knowledge at hand, you’ll be able to design and assemble your own rooftop racking systems or ground mount systems and connect everything together in a complete electrical circuit.
In this guide, you’ll learn about:
- Basic electrical rules
- Different types of DIY solar systems
- Sizing your solar system
- Installing racking systems for rooftops or ground mounts
- Tilt angle, azimuth angle and panel orientation
- Charge controllers and how to size them
- Types of battery systems and how to size them
- Solar inverters and how to size them
- Wire and circuit breaker sizing
- Common mistake to avoid
Things To Consider Before Installing a DIY Solar System
By now you’re probably aware of the fact that solar equipment doesn’t come cheap. It would be irresponsible for you to make such a large investment without factoring in all of your calculations and choices beforehand.
Some of the key things to consider are:
How much energy do you consume each month?
First and foremost, establishing your monthly energy consumption is critical. By doing so, you’ll be able to establish the size of your solar system and therefore the number of panels you’ll need.
Every home is different – we all consume different amounts of electricity.
According to the U.S. Energy Information Administration, the average household in the US uses approximately 877kWh per month.
In order to figure out how much electricity you consume each month take a look at your utility bill. You’ll want to take note of your monthly kWh consumed.
Here is an example utility bill:
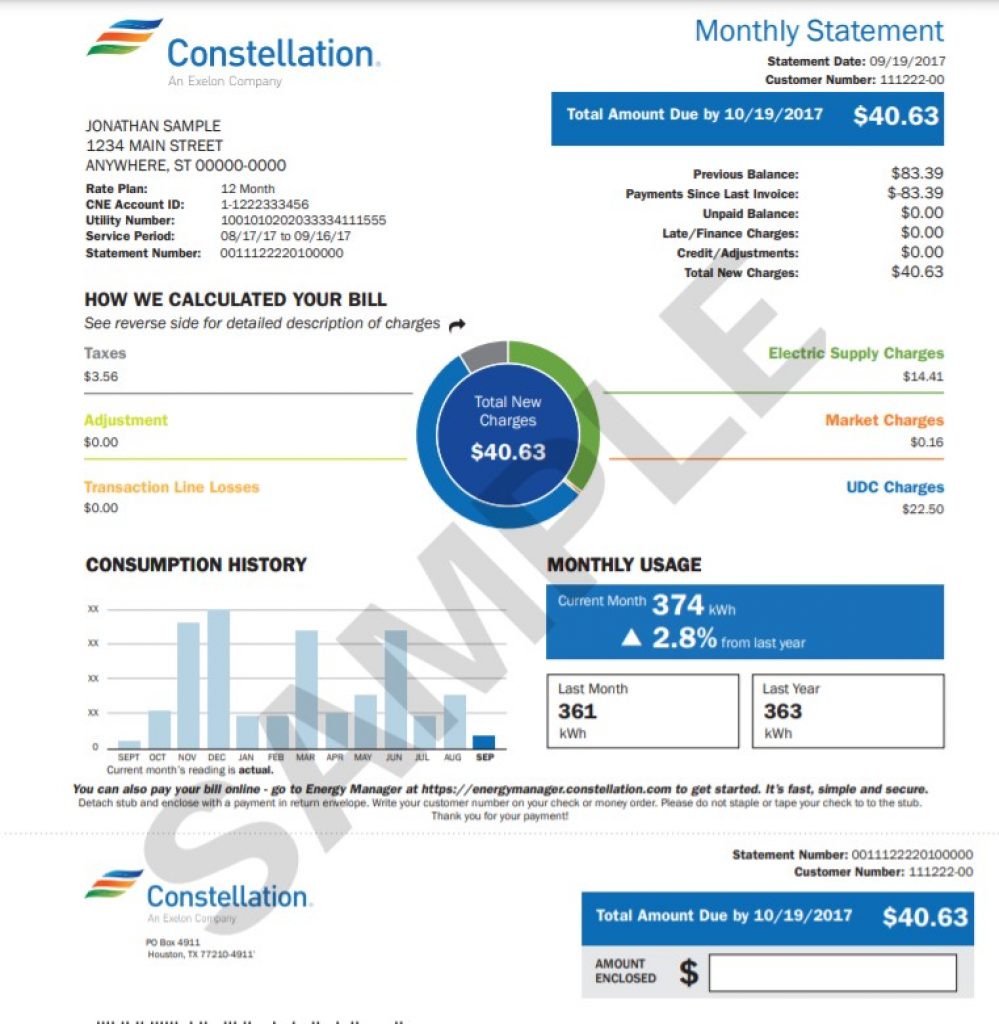
Look at your consumption history to get a good idea of your annual consumption. You’ll want to divide your annual electricity usage by 12 to get an accurate monthly consumption.
Remember, seasons change, you may use more electricity in winter, than in summer. So just using your latest electric bill may not give the most accurate information you need for your DIY solar system.
It is within your best interest to get your electricity consumption as low as possible. The lower your electricity consumption, the fewer solar panels you’ll need (reducing your upfront costs).
You can learn how to save energy here: 31 Ways to save electricity at home.
How long will you live in your home?
The majority of solar power systems take at least 5 – 6 years to pay themselves off (this depends on factors such as solar system size and home location).
After this period, your home will essentially be generating free electricity from the sun.
Most solar panel manufacturers back their products with a linear performance warranty for 25 to 30 years. You can therefore expect to be earning free electricity for at least 20 to 25 years.
However, according to iProperty Management, the average length of homeownership for U.S. citizens is 8.17 years. “Only 37% of Americans have lived in their homes for 10+ years“
Assuming you only own your home for 8 years (as per the statistics), would it really make sense to invest in a DIY solar system?
Well, according to the average pay-off periods, you would recover your initial investment within that time and would have at least 2 years of solar savings.
So yes, in this case, it would be worth it.
But perhaps you have already owned your home for 5 years? Make sure then that you don’t plan on moving out within the next couple of years if you really want to reap the solar rewards over the foreseeable future.
In addition to the above info, it is important to note that a solar system may increase your home’s value by 3.74% on the real estate market.
So even if you plan on moving within the next few years, investing in a DIY solar system can still be worth it.
What is the overall cost of a solar system?
The cost of solar has greatly reduced over the last decade.
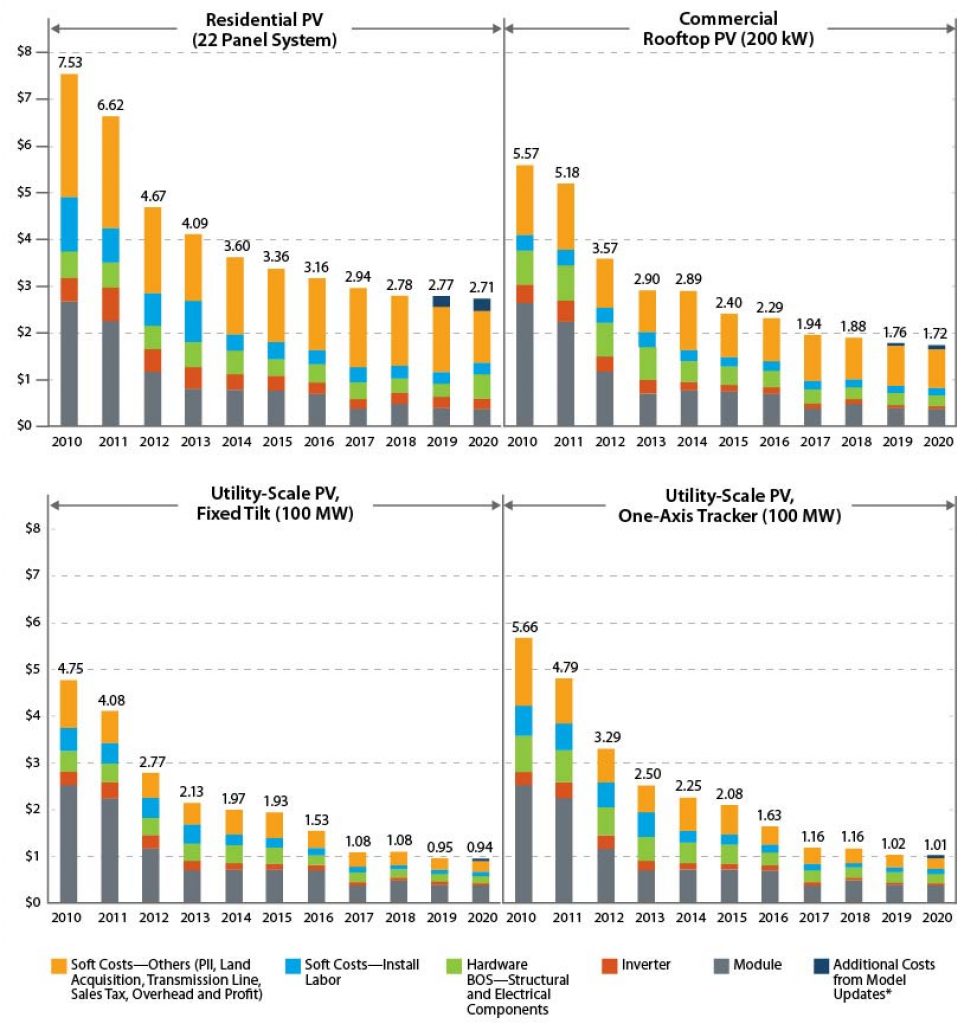
As you can see from the charts above, solar has been reducing in cost over the years.
The overall cost of a solar system varies from one manufacturer to another, but on average you can expect to pay anything between $5000 – $30,000 (or more).
Because you will be installing your own solar panels you can expect to save a significant amount of money on labor costs which would cost on average about $0.59 per watt.
Therefore, if you were to install a 6kW (6000 watts) solar system, you would save about $3540 on labor costs alone.
It is worth noting that the cost of labor varies from country to country. For example in Germany, labor costs are $0.36 cheaper per Watt than in the United States.
What type of roof does your home have?
A DIY solar system can be installed on almost any type of roof. However, some roof types require much more effort than others, resulting in extra costs.
For example, it is very hard to install solar panels on a regular wood-shingled rooftop. If you happen to live in a home with this sort of roof, we would highly recommend that you call an experienced, professional roof-top mounting contractor.
Some of the best roofs for solar panel installations are:
Asphalt Shingle Roof
For these types of roofs, a standard penetrating mount is used, which is easy to install.

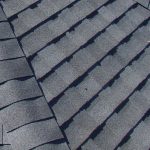
Tiles
Solar panels can be installed on these roof types with a standard penetrating mount that raises them above the roof. Tiles may need to be cut or lifted to make room for mounts.

Standing Seam Metal
Solar panels may be attached with a clamp, so no drilling is needed.

Flat
These roofs require either ballasted racking or a standard penetrating mount. Usually, tilt-up brackets are used to keep the panels at a 30-degree angle to the sun.
Where is your home located?
The location of your home probably plays the biggest role in determining how large your DIY solar system will need to be (alongside electricity consumption).
Why is that?
Well, sun exposure varies from location to location. The more sun your area gets, the more your home’s solar panels will benefit from the exposure.
- More sun = less solar panels needed
- Less sun = more solar panels needed
For example, a home located in Texas or California receives much more sun exposure than areas such as Montana or Minnesota.
Later on, in this DIY solar guide, we will teach you how to size your solar system based on your area’s sun exposure and your electricity consumption.
But for now, if you are interested in finding out your area’s exact horizontal solar irradiance (sun exposure) check out the resource we created here.
What permits will you need?
It is important that you acquire all of the necessary permits before installing your own solar panels.
These are the permits you will need for your DIY solar system build:
- Electrical permit
- Structural or building permit
- Dedicated solar photovoltaic permit
Regarding permits, it is best for you to consult with local professionals who know all about the legal issues and zoning laws within your city/country.
Information pertaining to building permits is very important as skipping this step may result in you having to rebuild your entire solar system, or being subject to a hefty fine.
Building permits are issued at the local level. Therefore, each state will have its own set of rules and regulations.
For more information on permits, give this article from EIA a read.
Basic Electrical Rules
Electricity is used in almost every household throughout the world.
If you’re wanting to build a DIY solar system it is critical that you understand the basic laws that govern how electricity works.
Understanding basic electrical concepts such as voltage, current, resistance, Ohm’s law, and circuit theory are all necessary for a successful DIY solar build.
We will begin by defining electricity.
Electricity is the flow of an electric charge.
This charge can be either positive or negative, denoted by a + or – symbol.
An electric charge is always generated by primary resources (such as the sun) and secondary sources (such as coal).
No matter how the charge is created, the actual flow of this charge results in an electrical current.
Primary factors of electricity:
- Voltage
- Current flow
- Resistance
Voltage – V
Voltage can be defined as an electromotive force that pushes the current to flow through an electrical circuit. It is measured in volts and denoted by the letter “V”.
Current – I or A
Current can be defined as the flow of electrical current. The flow rate of a current is measured in amperes (amps) and is represented by the letter “I or A”.
Resistance – Ω or R
Resistance is the measure of the ratio of voltage across an object to the current running through it. Essentially, it measures the opposition of the current that flows through the circuit. Resistance is measured in ohms which are denoted by the omega symbol: “Ω”.
Is there an easier way to understand voltage, current and resistance?
Yes, the above information can be explained using the water hose analogy:
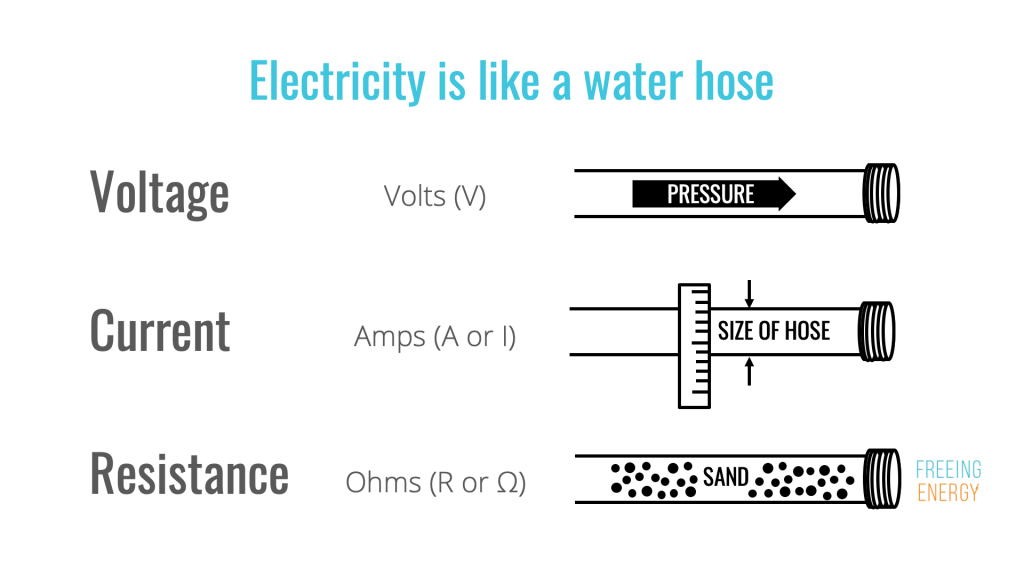
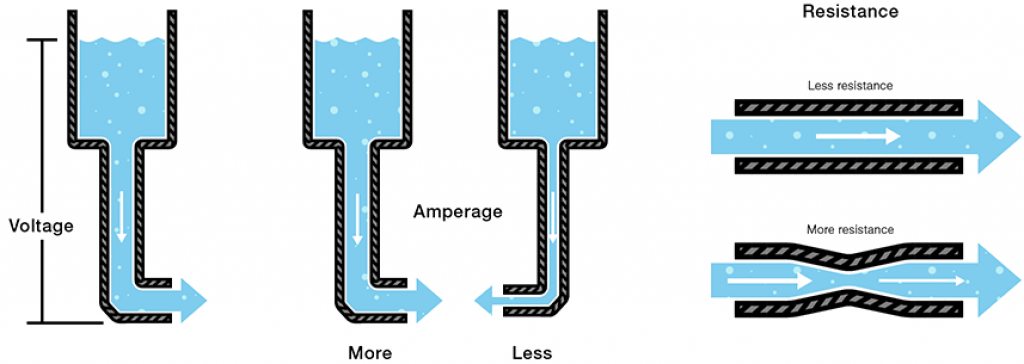
Does this make more sense now?
Ohm’s Law
Ohm’s law is pretty much one of the most practical laws of electrical circuits.
It means that the current flowing through a conductor is directly proportional to the voltage across it, provided that the temperature and external conditions remain constant.
Ohm’s law measures the potential difference and current flow:
(V = I * R) or (I = V/R) or (R = V/I
Different ways to connect your solar panels
We have compiled a complete guide on how to wire your solar panels. You can read that here.
Different Types of DIY Solar Systems
Today, technological advancement has led to multiple types of PV systems being created. Each one suits a certain situation better than the other.
It is important that you understand which PV system will best suit your DIY build.
The 4 types of solar systems are:
- Grid-tied system
- Hyrbid system
- All-in-One system
- Off-grid system
Grid-Tied System
A grid-tied solar system is connected to the local utility grid.
This type of system is suited to homeowners who aren’t interested in buying an expensive battery backup system to store their excess energy.
Grid-tied systems work in unison (so to speak) with the grid.
These systems supply all of your energy needs via the solar panels on your roof. When the panels are not able to keep up with your energy demands (at night or on overcast days for example) you are able to draw power from the utility grid (as per normal).
As previously mentioned, this type of DIY solar system is the least expensive because you don’t have to buy a battery backup.
Any excess energy generated by your solar panels is sent back to the utility grid. In this case, your utility acts as your battery backup.
Any unused power generated by your solar system is fed back to the utility.
Utility companies use net metering to credit homeowners the per kWh price they pay for energy consumption. We will go into more detail about net metering later on in this article.
DIY Grid-Tied Solar System Advantages
- Net metering – Save on your electricity bill by taking advantage of net metering.
- Lower intial cost – No special equipment needed.
- Short payback period – In comparison to off-grid systems.
- Passive income – When selling your excess electricity to the utility, they pay you using the current per kWh price.
DIY Grid-Tied Solar System Disadvantages
- Not suitable in remote areas – You need power lines to connect a grid-tied solar system.
- Zero power in case of a power outage – If the main power grid goes off, your solar system will shut down.
Components of a DIY grid-tied solar system
- Photovoltaic panels
- Solar inverter
- Electricity meter
- Electricity grid
- Wiring/cables
- Net metering
Hybrid solar system
Identical to a DIY grid-tied solar system with the added battery backup security.
A hybrid solar system is still connected to the local utility grid but only uses its power once your battery backup has run out of juice.
You are also able to sell excess energy to the utility with this system.
The battery backup in this system will meet short-term demands during the night, or on cloudy rainy days. This is beneficial because it draws power from your system first, before being charged to draw from the utility grid.
Hybrid solar systems work by channeling the electricity generated through the solar panels into the hybrid inverter.
From here the inverter decides whether it should convert the DC electricity into useable AC for your household appliances, direct it back to the grid or store it in your battery backup system.
DIY Hybrid Solar System Advantages
- Uninterrupted power supply – Hybrid solar systems allow you to have access to power 24/7.
- Save money – Upfront costs are higher than a Grid-tied system, but in the long term hybrid systems save you money.
- Store excess electricity – The battery bank allows you to store energy for later use.
DIY Hybrid Solar System Disadvantages
- Higher upfront costs – Hybrid systems require more complex components to operate, thus increasing the upfront costs. (For example a Tesla Powerwall 2 will cost you between $10,000 – $16,000 and this doesn’t include panel costs.)
- Requires more installation space – More space is required due to the extra components needed.
- Not suitable in remote areas – You need power lines to connect a grid-tied solar system.
Components of a DIY hybrid solar system
- Photovoltaic panels
- Hybrid inverter
- Battery bank
- Charge controller
- Wiring/cables
- Net metering
All-in-One System
A new addition to solar system technology is the all-in-one system. These systems are also referred to as inverter chargers with a built-in charge controller.
All-in-one systems have lower upfront costs and require less space for installation.
Essentially this system is a combination of an AC charger, solar inverter, and a solar charge controller.
These systems come in 12, 24, and 48 volts and can be used in both off-grid and hybrid systems.
Off-Grid System
DIY off-grid solar systems allow you to be completely energy independent – you don’t need to rely on the utility grid for any electricity. You generate and store your own.
For these types of systems, your battery backup is absolutely critical, as you will need to rely on this during evenings or overcast days.
It should come as no surprise that these systems have higher upfront costs due to all the components needed to take your system off-grid.
With that being said, recent technological advancements related to PV equipment have allowed the technology to become ever more efficient. It is not uncommon to find off-grid systems powering campervans, boats, and cabins.
So if you do go this route, rest assured that you’ll be getting your money’s worth.
DIY Off-grid solar system advantages
- Can be installed in remote areas – No utility is required for this setup. All you need is the sun and equipment. You could generate electricity in the middle of the jungle if you wanted.
- No downtime – Having access to your own stored energy means you will never have any down time (in the case of a power ouatge).
DIY off-grid solar system disadvantages
- Expensive – Due to all the components needed, this type of solar system can be expensive to invest in.
- High maintenance – Additonal components in this build require more ongoing maintenance, such as the refilling of lead-acid batteries. (On that note, we always recommend using LiFePO4 batteries in your setup if your budget allows).
- Battery replacement – Battery banks often need to replaced every 10 or so years (depending on the technology you use, it could be less than that too).
Components of a DIY off-grid solar system
- Photovoltaic panels
- Solar inverter
- Charge controller
- Battery bank
- Wires/cables
How To Size Your DIY Solar System
Knowing how to size your solar system is one of the most important aspects of your DIY build. Thankfully, it is not the most complicated process.
Below we will outline how to size a grid-tied, hybrid, and off-grid solar system. All you need to do is follow along with the steps we outline.
In our opinion, this is one of the most enjoyable parts of the solar build (besides the actual build) as you are figuring out what type of solar system you will need to suit your individual needs.
Sizing a grid-tied solar system
To size a grid-tied solar system you need the following:
- Electricity consumption
- Your area’s peak sun hours
- Calculate the panels output
- Useable area on your roof
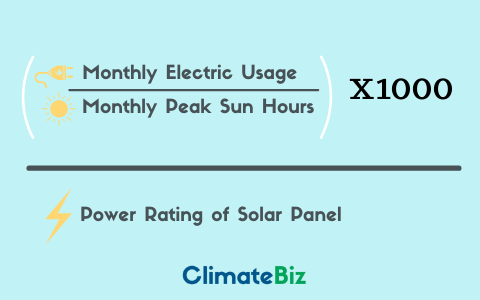
We created a basic formula to help you along:
Estimating your energy consumption
Estimating your energy consumption is easy, you need this information in order to know how many solar panels you will need to offset your consumption.
Take a look at your utility bills, you need to figure out your monthly consumption by averaging out all 12 months in a year.
This is important as your consumption will be heavier in the summer and winter months when heating and cooling requirements are at their peak.
| Monthly Electricity Consumption | kWh |
|---|---|
| January | 859 |
| February | 702 |
| March | 673 |
| April | 650 |
| May | 680 |
| June | 834 |
| July | 1120 |
| August | 1145 |
| September | 1038 |
| October | 1134 |
| November | 863 |
| December | 967 |
| Total | 10,665 |
As you can see in the above example consumption varies greatly from month to month. All we have to do now is take the year’s total and divide it by 12 to get the yearly average kWh consumption.
In this example, it would be 888.75 kWh per month or 29.21 kWh per day.
Determine your area’s monthly peak hours
The amount of peak sun hours your area receives all depends on the climate and location of your home.
Usually, this information is hard to come by.
However, we have made this part quite easy thanks to our dedicated peak sun hour resource for the United States (we also have the peak sun hours of the United Kingdom, Australia, and South Africa)
For the purpose of this DIY solar system guide, we will assume you live in California (you can however follow along using the metrics for your own location, check out our peak sun hours resource.)
California experiences 5.2 daily peak sun hours. In order to figure out the monthly amount, simply times the daily amount by 31.
5.2 * 31 = 161,2 peak sun hours a month in Callifornia.
Calculate your panels output
In order to obtain the power output of your potential PV system, you need to take your monthly power consumption and divide it by the monthly peak sun hours of your area, then multiply that number by 1000.
Why do we times by 1000?
A peak sun hour equates to 1 hour in which the sun’s solar irradiance (sunlight) produces an average of 1000W (energy) per square meter (roughly 10.5 feet). In other words: 1 peak sun hour = 1000 W/m² of sunlight per hour.
888.75 kWh / 161.2 = 5.51
5.51 x 1000 = 5510 watts (5.5 kW).
So, in essence, 5510 watts is the sort of power output you will need from your grid-tied system to offset your electricity consumption.
However, remember that PV setups do experience system losses through the solar inverter, cables, and by various other means.
All these losses amount to about 25% of the system’s total power.
Therefore, in order to size the correct system and to make up for these losses, you need to add 25% to your DIY solar arrays output:
5510 watts * 1.25 = 6887 watts.
So, if you would like your DIY grid-tied solar system to offset 100% of your electricity consumption, you’ll need to install solar panels amounting to 6887 watts of power output, or a 6,87 kW solar system.
Most first-time DIY installers only want to offset 50 – 75% of their electricity consumption (to lower the startup costs).
If this is the case for you, simply take your total power output and times it by the percentage you want your DIY system to offset.
For example:
6887 watts * 75% = 5165 watts or 5.16 kW.
Calculate how many solar panels you need
This step is probably the easiest.
Let’s assume you decide to install Renogy’s 320-watt solar panels.
All you have to do is divide the total power output of your desired system by the power output of a single solar panel (from the manufacturer of your choosing).
In this example, we want to install a 5165-watt solar system using Renogy’s 320-watt solar panels.
5165/320 = 16,14 panels needed. (since there are no partial panels in existence, round off this number, to one metric higher.) – 17 panels are needed.
Sizing a hybrid solar system
Remember, as previously discussed a hybrid solar system relies on both the utility grid in conjunction with its own battery bank.
The sizing of a hybrid solar system in terms of the panels needed is exactly the same as the sizing of a grid-tied system, so please follow the same steps.
Here you want to focus on the sizing of your battery bank.
Sizing your battery bank
Unlike off-grid solar systems, hybrid solar systems simply need to cover your essential loads with the battery bank.
In order to correctly size your battery bank, you have to collect and list the consuming load of all your essential household appliances.
Here is an example list we created of essential loads we would like powered in the event of a power outage:
| Loads | Power (Watts) | Duration (Hours Used) | Daily energy usage (Watt-hour) |
|---|---|---|---|
| (x8) 10 Watt LED Lights | 80 | 6 | 480 |
| (x2) 110 Watt laptops | 220 | 3 | 660 |
| (x1) 90 Watt TV | 90 | 3 | 270 |
| (x1) 300 Watt Fridge | 300 | 12 | 3600 |
| (x1) 600 Watt MicroW | 600 | 1 | 600 |
| (x1) 320 Watt Washing machine | 320 | 1.5 | 480 |
| 6090 Watt Hours |
No battery bank is 100% efficient, for this reason, you need to account for a 15% battery loss.
Therefore, you need to divide your total wattage by 0.85 battery efficiency:
6090Wh/85% = 7164Wh total battery capacity required.
Batteries are not rated in watt-hours, so it is best that you convert this into amp hours.
To do this simply divide the batteries capacity by the battery voltage rating (12V, 24V, or 48V)
In this example, we are using 12V batteries.
Therefore, 7164Wh/12V = 597 Amp hours (Ah).
In order to know how many batteries you will require, just divide your total Amp-hours by the battery Ah.
597Ah/100 = 5.97 round this off to 6. You will need six 100Ah batteries to supply enough power to the essential items mentioned in the table above.
Remember, should the power be cut, this size battery backup will only supply enough power to your essential appliances.
Sizing an off-grid solar system
Sizing an off-grid solar system is different than sizing a grid-tied system in that your system needs to supply the correct amount of power daily.
For this, you need to focus on the daily kWh usage instead of the monthly or annual electricity bills.
Off-grid solar systems need to offset your electricity consumption by 100% and supply extra in order for you to store energy for evenings and overcast cloudy days.
First things first, you need to make a list of all the major appliances in your home and how much electricity you use on a daily basis.
To do this, you can use a load evaluation calculator. Alternatively, you can check the back of each appliance’s energy guide sticker to see what the device’s power consumption rate is.
Step 1 – Determine your energy needs
If we want to do this manually (recommended) you’ll need to create a similar list to the one we did above, except this time it is not just for essential items, but all of the appliances in your home.
| Loads | Power (Watts) | Duration (Hours Used) | Daily energy usage (Watt-hour) |
|---|---|---|---|
| (x10) 10 Watt LED Lights | 100 | 24 | 2400 |
| (x2) 110 Watt laptops | 220 | 5 | 1100 |
| (x1) 90 Watt TV | 90 | 5 | 450 |
| (x1) 300 Watt Fridge | 300 | 24 | 7200 |
| (x1) 600 Watt MicroW | 600 | 1 | 600 |
| (x1) 320 Watt Washing machine | 320 | 1.5 | 480 |
| (x1) 2000 Watt Oven | 2000 | 1.5 | 3000 |
| (x1) 1200 Watt Dishwasher | 1200 | 1 | 1200 |
| 16,430 |
Please continue with the list as it applies to you. For this example, we will continue with our “completed” table above.
Step 2 – Add inverter load
It is important that you don’t forget to account for inverter and system efficiency losses. Inverters always consume a fraction of generated power when working.
For this reason, you need to add the consumption rate of the inverter to your daily total.
Different types of inverters have different consumption rates, make sure to look at the spec sheet of your inverter to determine its consumption.
- Inverter load = 40 watts
- Watts * 8 hours = 320Wh
- Total household load = 16,430Wh + 320Wh = 16,750Wh.
You will also need to account for efficiency losses of between 5% to 15%. These losses depend on the type of inverter you use.
As such, we always recommend using a high-quality pure sine wave inverter.
Step 3 – Calculate your battery size
As you already know, batteries store solar energy for later use. In an off-grid build, this is critical.
The size of your battery depends on how much power you need to run your appliances effectively. In the winter months, you may have to rely on a backup generator as solar storage may not be sufficient.
Remember to consider system efficiencies and temperature coefficients when sizing your off-grid systems battery bank.
To make up for these inefficiencies you have to oversize your DIY solar system.
First, select your off-grid system’s battery voltage.
- 12V – Best for smaller systems
- 24V – 48V – Best for medium to large systems
Alright, let’s create an example.
Based on the table above, your energy consumption is 16,430Wh.
Considering your inverter efficiency rate is 90% you need to add 10% to your daily power consumption:
16,750Wh * 1.1 inefficiency = 18,425Wh
Next, account for temperature changes in your battery capacity to deliver power.
Assuming you are using lead-acid batteries in your DIY off-grid solar setup you will need to multiply your battery capacity by 1.59%
18,425 * 1.59 = 29,295Wh
If you use lithium-ion batteries in your build, multiply your required capacity by 1.2.
18,425 * 1.2 = 22,110Wh
As we have previously mentioned. Going with lithium-ion batteries over lead-acid is definitely recommended.
For that reason, we will continue along with the example of using lithium-ion batteries.
Once you have taken into consideration how temperature fluctuations affect battery performance, we need to take into account the efficiency loss that happens during charging and discharging.
Efficiency loss for lead-acid = 20%.
And for lithium-ion = 5%.
Therefore, the minimum energy storage capacity of your battery bank:
22,110Wh * 1.05 = 23,215Wh
Days of autonomy
Next, you need to calculate the days of battery autonomy.
This means figuring out how many consecutive days you need your battery to supply you with energy (in the event your solar panels are not able to recharge the battery bank due to bad weather).
Usually, this number sits around 2 to 5 days.
For our example, we will use 3 days.
23,215Wh x 3 days = 69,645Wh
As you can see, temperature changes and days of autonomy drastically affect the size of your required battery.
Next, we need to convert watt-hours into amp hours. To do this divide battery capacity by the voltage.
69,645Wh / 12V = 5803,75Ah
If you were to use 200Ah batteries to build your off-grid battery bank you would need:
5803,75Ah / 200Ah = 29 lithium-ion batteries.
Discharge rates
Always remember that lead-acid batteries can only be discharged up to 50%. This means you would have to double the required amount of batteries to reach your capacity demands.
If you use lithium-ion batteries you can continue with the above results of 29 batteries.
Solar Panels
By now you are likely well aware that there are many different types of solar panels. Therefore, we will not go into too much detail on this topic.
If you are interested, you can read about how solar panels work here.
Irradience and PV performance
Just as high temperatures affect solar panel performance, irradiance exposure influences PV performance.
In simple terms, less exposure to sunlight results in less generated electricity, and vice versa.
Irradiance is defined by the total amount of solar power per unit area that hits the surface at a specific angle.
The irradiance unit of measurement is watts per square meter or kilowatt per square meter.

As our planet rotates around the sun, the distance between the two always changes.
Because of this, irradiance levels vary from one point to the next. According to NASA, the average irradiance on a flat surface square to the sun is 1360.8 ± 0.5 W/m2.
However, irradiance levels reaching the earth’s surface, in reality, are lower. This is mainly due to climatic conditions which affect the scattering and reflection of the sunlight as it penetrates our atmosphere.
A pivotal part in designing your DIY solar system is estimating the amount of sunlight that hits your home.
The measurement you want to use when determining the amount of solar irradiation that hits your area is known as Global Horizontal Irradiation (GHI).
The best online resource to find the GHI of your area is Global Solar Atlas, download your area’s GHI here.
Understanding tilt and orientation
You need to take note of the following things when mounting your home’s solar panels.
- Tilt of the modules
- Portrait or landscape
When you are installing your solar panels, you’ll be able to adjust the tilt angle. Doing this will optimize the efficiency of the panel’s performance.
Keep in mind, you only need to consider tilt angle when installing a DIY solar system on a flat roof or a ground-mount system.
If your roof is pitched, the tilt angle of your solar panels will replicate the natural tilt of the roof.
The tilt angle of your solar panels depends on the latitude. The further your home from the equator, the higher the tilt angle.
As an example we have compiled a table showing the different optimum tilt angles for the most populated cities in the United States:
| Winter | Spring/Fall | Summer | |
| New York | 72° angle | 46° angle | 26° angle |
| Los Angeles | 80° angle | 56° angle | 32° angle |
| Chicago | 72° angle | 48° angle | 24° angle |
| Houston | 80° angle | 60° angle | 36° angle |
| Philadelphia | 74° angle | 50° angle | 26° angle |
| Phoenix | 80° angle | 57° angle | 34° angle |
| San Diego | 80° angle | 57° angle | 34° angle |
| Honolulu | 92° angle | 69° angle | 42° angle |
As a general rule of thumb, tilt angles should match the latitude of your home’s location in summer.
High tilt angles during winter can increase the energy production of your solar panels.
How to calculate the optimal tilt angle?
To make it easier to establish optimal tilt angles for your solar panels we have created a formula for you to use:
Add 15° to your latitude in winter and subtract 15° during summer.
For example, you live in London, your latitude is 51°:
- Winter: 51° + 15° = 66° (optimal tilt angle)
- Summer: 51° – 15° = 36° (optimal tilt angle)
Alternatively, you can use another formula that is even more effective for establishing optimal tilt angles to take advantage of the midday sun.
For example, you live in Sydney Australia, your latitude 33°:
- Winter: (33° * 0.9) + 29 = 58.7° (Optimal tilt angle)
- Summer: (33° * 0.9) – 23.5 = 6.2° (Optimal tilt angle)
During spring and fall simply just subtract 2.5° from the local latitude to get the optimal tilt angle of your DIY solar panels.
Azimuth angle
Charge Controllers
Solar charge controllers exist to protect your batteries from overcharging, as well as over-discharging.
They do this by regulating the voltage and current that pass from the solar panels to the batteries.
There are two different types of solar charge controller technologies on the market, PWM and MPPT.
In this article we discuss how you can select the correct type of controller for your setup.
How to size a PWM charge controller?
Sizing is a PWM charge controller is fairly simple, they are rated in amps.
To do this, you first need to find the short circuit current (ISC) of the solar panels you have chosen.
Once you have found the ISC, multiply that amount by the number of parallel strings. By doing this you will establish the total current of your solar array.
Now, keep this number written down somewhere.
You also need to take into consideration two safety factors:
- 25% for over irradiance conditions
- 25% for more than 3 hours of continuous use (which is often the case)
Therefore the formula is as follows:
By using this formula you can easily see if your PWM charge controller is the correct size for your DIY solar system.
So, let’s end off with an example to make this even easier to understand.
Say you went with x4 320 watt solar panels from Renogy, the panel’s specification sheet indicates that the Isc is 10.08 amps.
The maximum current is calculated as follows:
2 strings * 10.08 amps (Isc) * 1.25 * 1.25 = 31.5 amps
So in this scenario, a PowMr 40 amp PWM charge controller would be sufficient for our off-grid DIY solar system setup.
Sizing an MPPT charge controller
When sizing a a MPPT charge controller you need to consider the following:
- Current (amps)
- Voltage
- Temperature
1. Current
MPPT charge controllers often reduce a DIY solar arrays voltage to the charging voltage of the solar batteries.
Remember, the power into the charge controller is equal to the power flowing out of it, this results in a rise in the output current.
Therefore, by dividing your solar arrays power output by the battery voltage you can determine its amperage.
Once you have this number, always multiply it by 1.25 (NEC safety factor).
2. Voltage
MPPT charge controllers are able to handle higher nominal voltages than batteries. However, the Voc is the limiting factor here.
For example, a 24-volt solar panel has a Voc of about 44 volts.
Therefore when deciding on which charge controller to go with for your DIY solar system, make sure to select a controller that can handle he open circuit voltage of the string.
3. Temperature
Temperature fluctuations can affect the amount of voltage solar panels produce.
In colder temperatures for example, the Voc can increase in each string by approximately 0.03% per each degree Celsius below freezing.
While higher temperatures above 25°C has no affect on sizing a solar charge controller.
We recommend you to keep this information in mind should you plan on setting up your solar system in freezing conditions.